eMart
Multipurpose WordPress eCommerce Themes
- latest update: 07/14/2022
- by: aThemeArt
- athemeart.com/
- email: athemeart.com@gmail.com
Theme Installation
After purchase, the eMart PRO version you will get a notification email about purchase confirmation email with the download link or log in our site customer area then goes to Purchase History to download.
There is two way to install eMart PRO WooCommerce theme – Let's Check It out
To Install eMart through WP-Admin :-
- First, Navigate to WP Dashboard —> Appearance —> Themes, then hit the Add New Theme button.
- Second, hit the upload button, and a browse button will appear. Now click the browse button.
- Afterward, a pop-up window will come, then take the emart-pro.zip file and hit the install now button to install.
- Now you’ve to wait patiently to complete your installation. After installation is complete, a activate button or link will appear.
- And finally, hit the activate button or link to activate the eMart theme.

To Install eMart through FTP Upload:-
- Download the emart-pro.zip file to your local machine and unzip it.
- Second, Run your FTP manager and add it with your hosting and browse ( to your_hosting_home/WP-Content/Themes )
- Third, upload the eMart-pro theme folder and sign in to your WP Dashboard —> Appearance —> Themes.
- Lastly, find the prefix and click to activate your theme.
If You Get Errors:-
If you encounter the message “Are you sure you want to do this? Please try again.” or “The link you followed has expired” when attempting to install, this is most likely occurring because your server has a low maximum file size upload/low maximum execution time set in the PHP settings. You must increase the following PHP settings to be greater than 24M (Any reputable hosting company will assist you with this quickly & hassle free):
- upload_max_filesize – greater than 24M
- post_max_size – greater than 24M
- max_execution_time – greater than 100
or you can upload the theme through FTP instead to bypass this all together.
Required Plugins / Pro Features
You need to activate some plugins to get all pro features of this theme.
When you finish activating the emart pro theme, you’ll see the below notification:

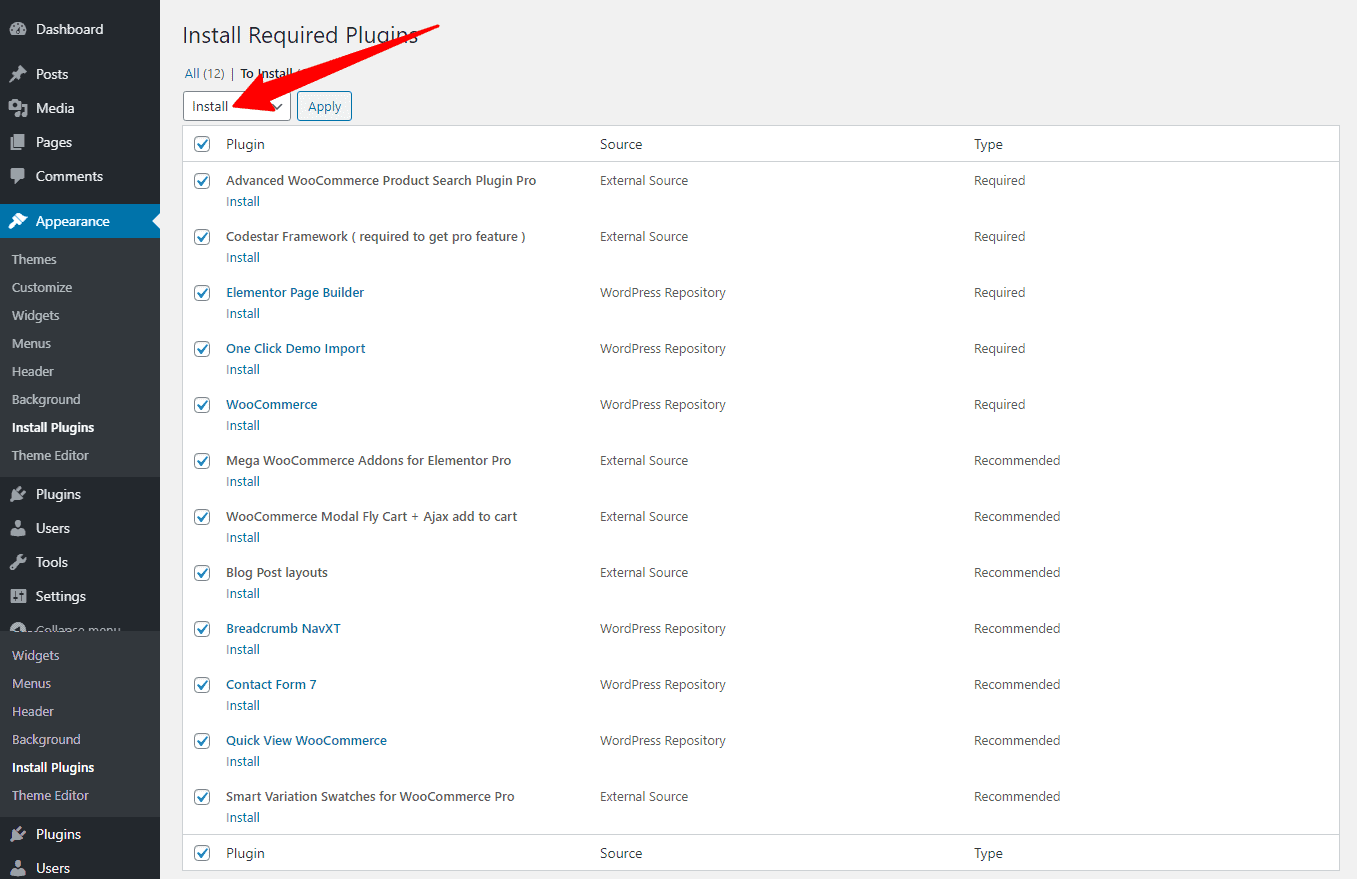
Now it’s the right time to click to start installing plugins. And you’ll be navigating to the Install Required Plugins page.
But before the start, please ensure all of them or some recommended plugins you like. Then, select install from the drop-down options, and click the Apply button.
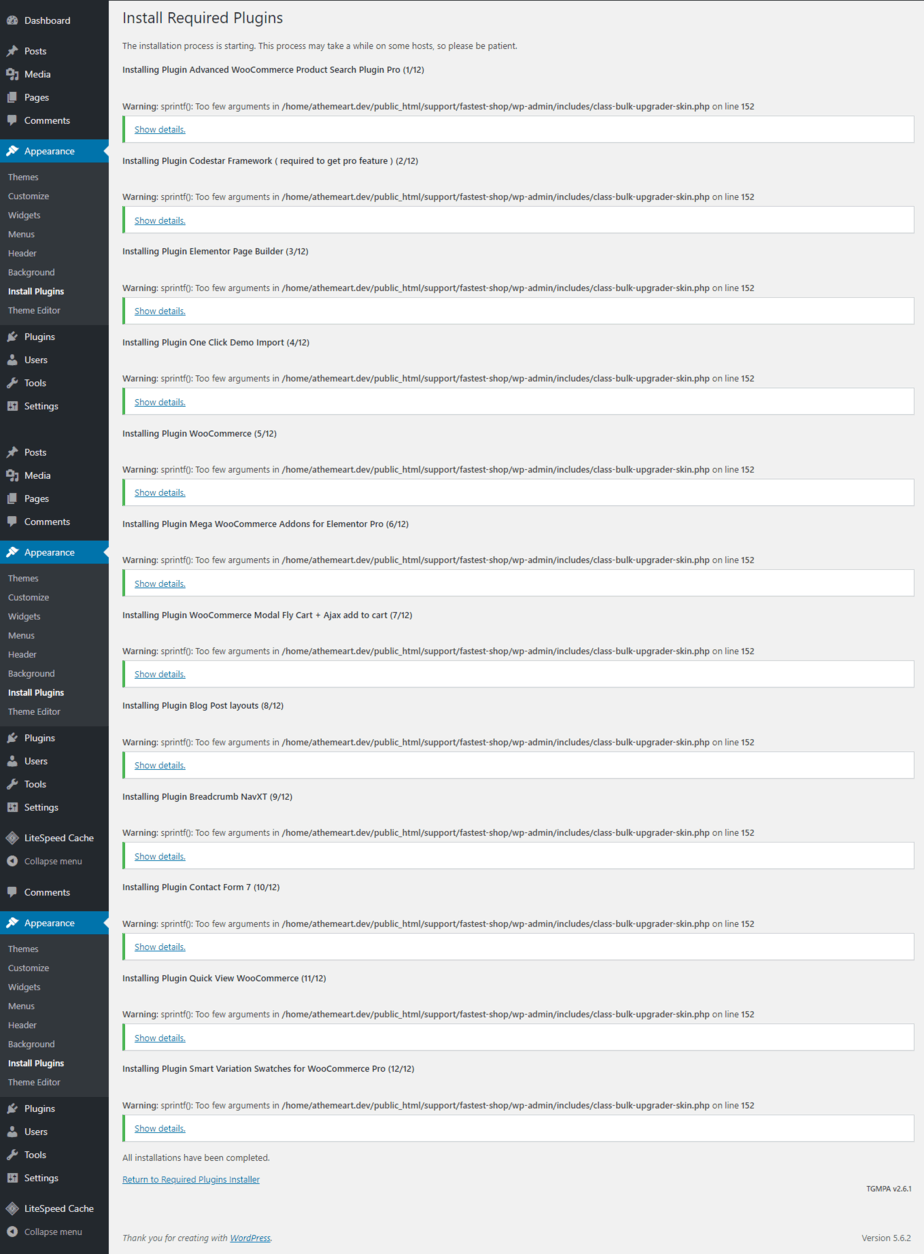
After finishing the installations of require plugins, you’ll be navigating to another page. And it’ll look like:
NB:- Bear in mind, these are the essential plugins for the emart pro theme, given below.
So, below is a listing of theme require plugins. You need to activate the required plugins to get your emart pro theme’s full functionality.
- Elementor
- Codestar Framework ( include with theme )
- Layouts for Elementor Pro ( include with theme )
- Sina Extension for Elementor
- Sina Extension Pro for Elementor ( include with theme )
- Contact Form 7
- Instagram Feed Widget
Demo Import
eMart pro wraps up with a one-click demo importer to make your site very easily and fast like our demo. To import the Demo Content, eMart pro’s has two (02) method. Carefully read the given below instruction to learn how to make it:
Import Demo Content Via One-Click Demo Importer:
So, before starting the instruction, please be confirmed that you’ve installed and activated the required and recommended plugins.
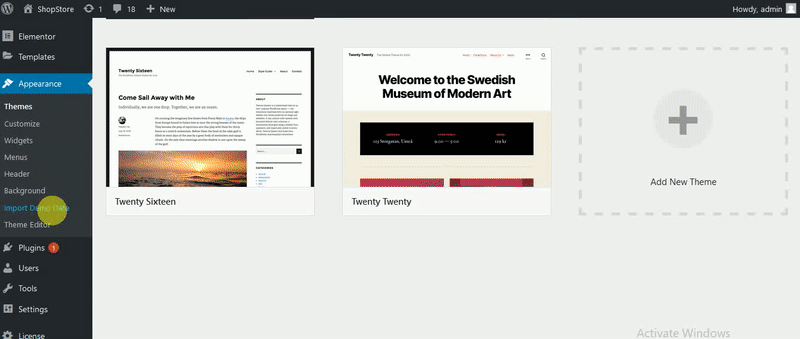
- Firstly, oper your WordPress dashboard, then navigate to Appearance -> Import Demo Data.
- Here you’ll see your demo contents, therefore pick the one you want to import and click the import button.
- It’ll take approx 6-10 minutes, so wait patiently for the import process to complete.
Another method of Demo Content importing
Here is another process to import the Demo Content. So, let’s apply it:
- Firstly, run your WordPress dashboard, then go to Tools -> Import.
- Find and pick the “WordPress” from the list.
- Upload the demo.xml using the form provided on the theme page.
- You’ll be asked to map the authors in this export file to users on the blog. For every author, you may choose to map to an existing user on the blog or to make a new user.
- Then you’ll have the opportunity to import attachments, therefore, click the “Download and import file attachments” box.
- After finishing the demo import, you’ve to select the static home and blog page.
How long the process should take:
Basically, it’ll take max 6-10 minutes to complete. But if you see the import is taking more than 6-10 minutes, there’s might be a problem. So, you can turn away from the import page.
Or, if your import gets stuck, you need to increase the max execution time. You can add this code to your wp-config.php file right above the “/* That’s all, stop editing! Happy blogging. */” line:
set_time_limit(600);
If you constantly have the trouble, be confirmed that you’ve enough memory allocated to PHP. This can be set in your wp-config.php file. Try upping it to 256M.
General And Global Settings
The General setting is an option where we provide all the necessary information, so you can easily customize the eMart eCommerce theme. Also, we combine the General option and More essential in our General setting, thus, you can customize the theme comfortably. So, check and read the theme settings carefully, so that, you can make your theme instantly and trouble-free.
How to update your Site Logo and Favicon ?
To upload the logo, first of all, open your WordPress Dashboard, then go to Theme options ==>> General Options. There you’ll find a button box named by Add image. So, click to make the change.
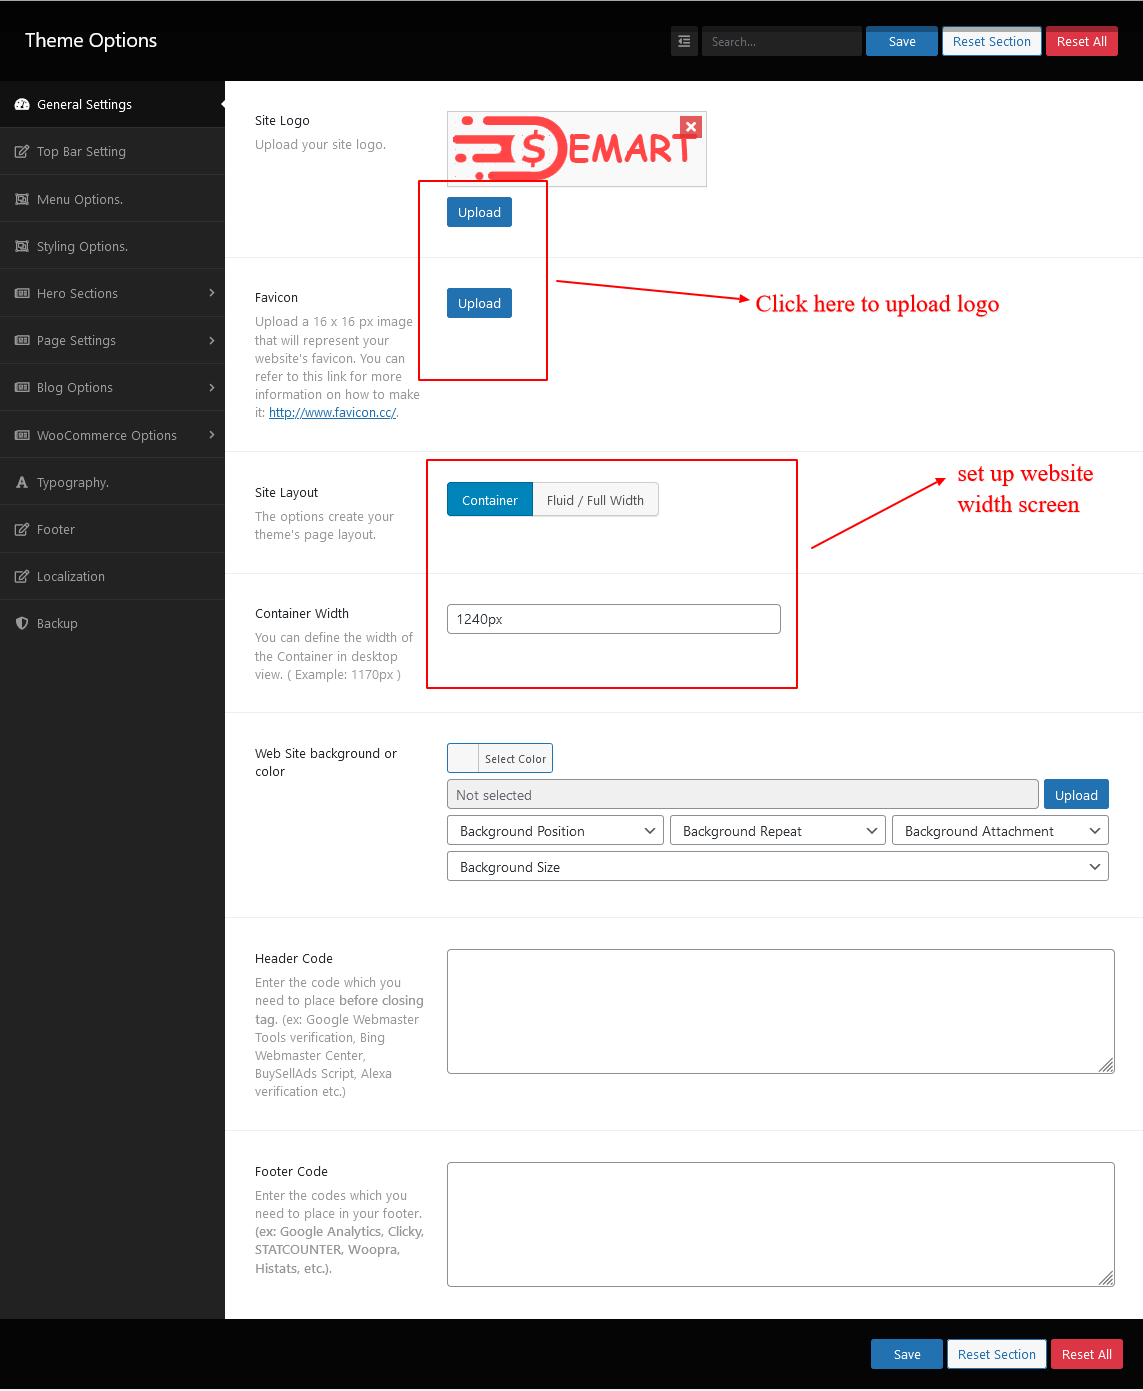
There you’ll see the Site Layout and a button box with two options Container, and Fluid. So, make it how you want to change the site layout. NB: Mainly, there are two types of site layout, such as: Container- This will take 1600 pixels of your monitor. Fluid- Which will take full wide.
How to add Toolbar contacting information and social profile ?

To set the top bar customization, you’ve to navigate WordPress Dashboard ==>> theme option ==>> Top Bar Setting. There you’ll see the Display location, social icon and color update options. So, click it to set up.

How to change the overall website color scheme ?
To change the overall site color scheme of the eMart theme, kindly navigate to WordPress Dashboard ==>> Theme options ==>> Styling Options . There you’ll see Primary Color Scheme, Secondary Color Scheme, Tertiary Color Scheme, Quaternary or Posts Title Color Scheme, and Main Menu Background Color with their respective button. So, make the changes how you demand.

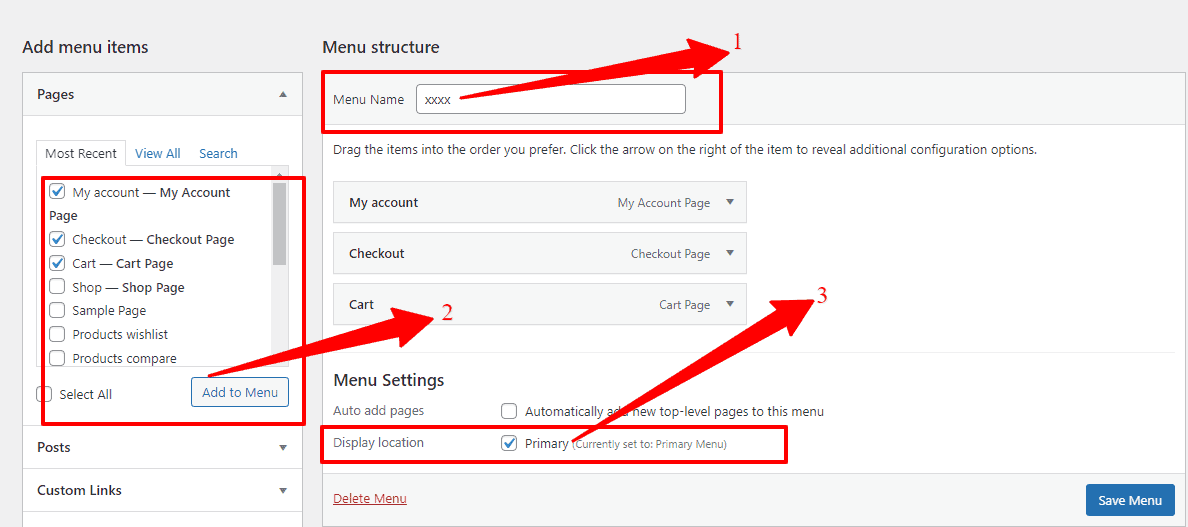
Setting up Main Menu

First, go to your WordPress Dashboard ==>> Appearance ==>> Menus. And in there, you’ll see the Menu Structure ==> Menu Name with an empty box. So, name your Menu Option and click the Create Menu button. Second, find the Add menu items. And in there, you’ll see My Account Page, Checkout Page, Cart Page, Sample Page, and so on. So, click on these options that you need, and then click the Add Menu button. Third, find the Menu Settings. And in there, you’ll see Display location with a clicking option. So, click the option. And at last, click the Save button to add Navigation Menu.
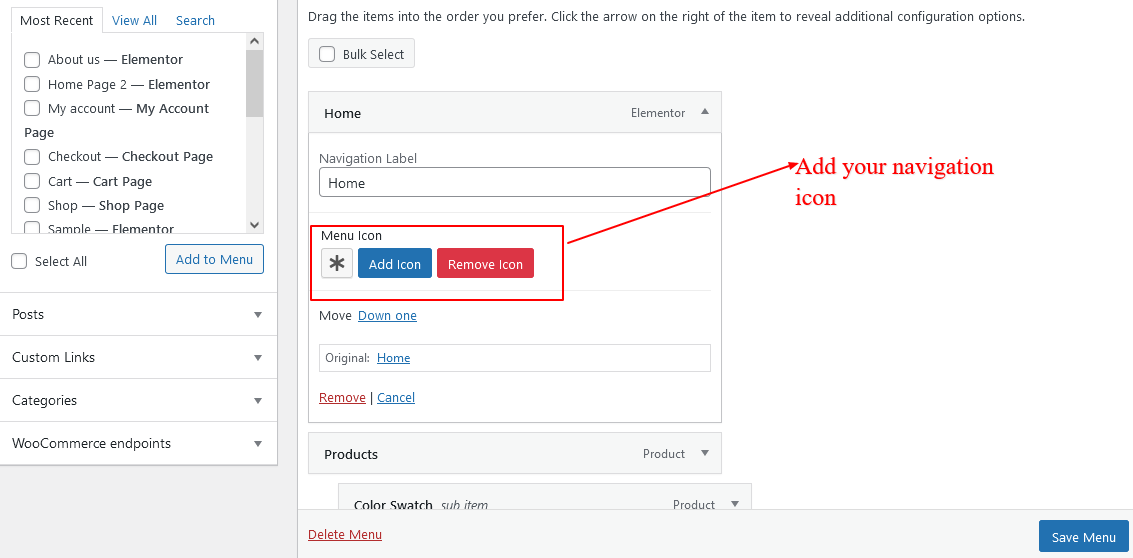
How to add the Menu Icon ?
First, go to your WordPress Dashboard ==>> Appearance ==>> Menus. And in there, you’ll find the Menu structure with lots of options. Like, Home, Shop, Checkout, Cart, and so on. Second, click any one of these options, and you’ll see the Menu Icon with an Add Icon.
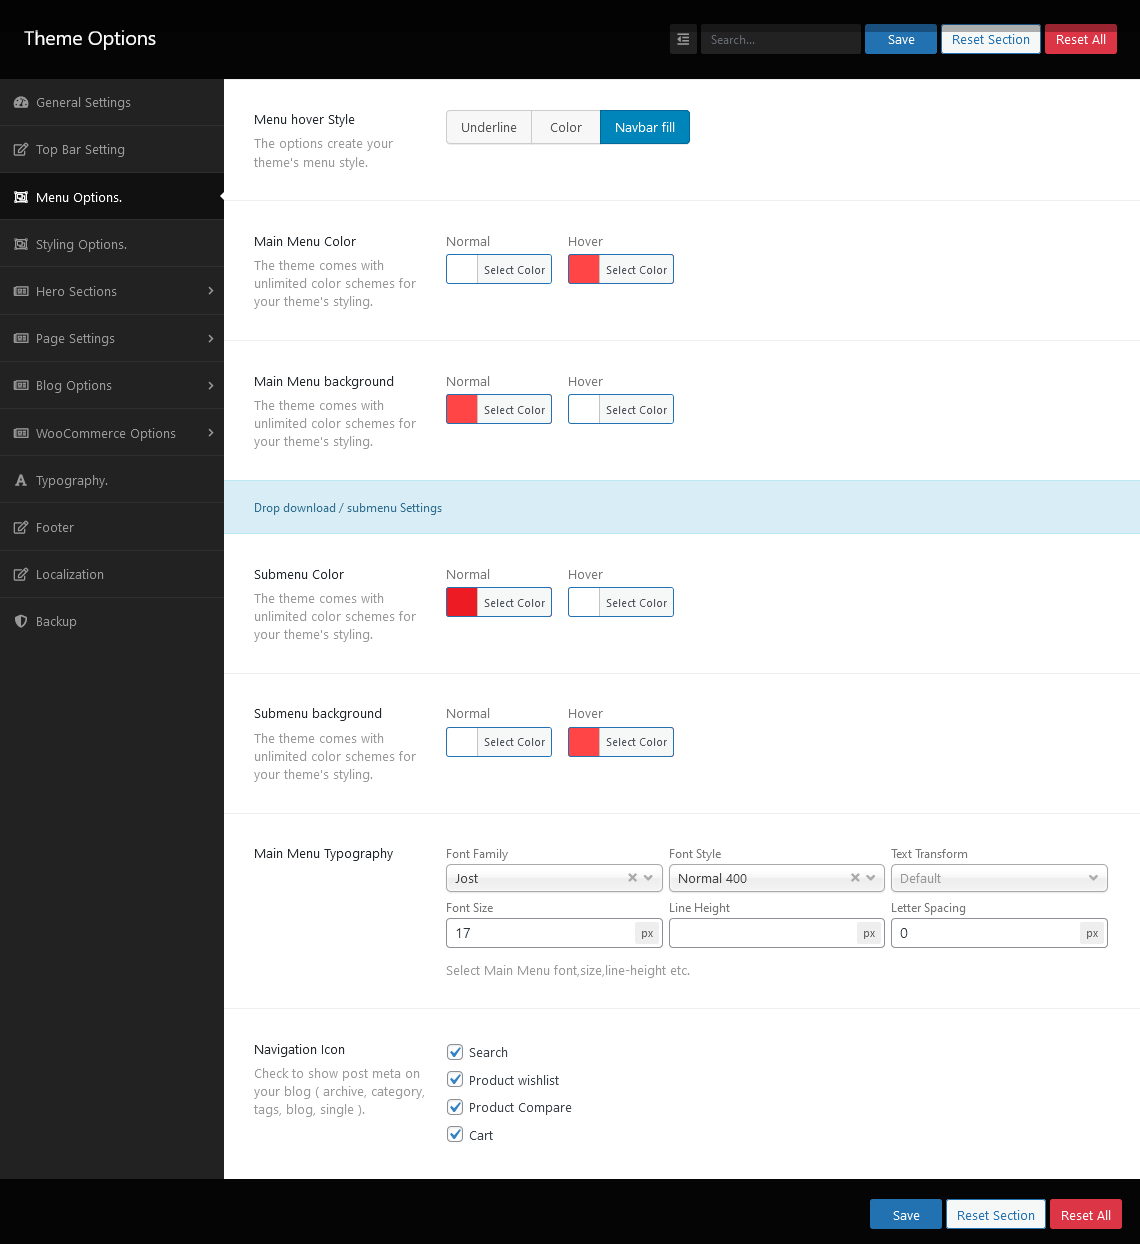
How to Customize the Main Menu?
Please navigate to WP Dashboard ==>> Theme options ==>> Menu Options to set up the main menu option. In there, you’ll see the , Main Menu Color, Main Menu background, Submenu background, and Main Menu Typography, etc., with their respective options. So, click to set up the main menu options you want to show.
Settings up Home Page
To start and activate a static front-page for the eMart Theme, please follow the instructions given below:
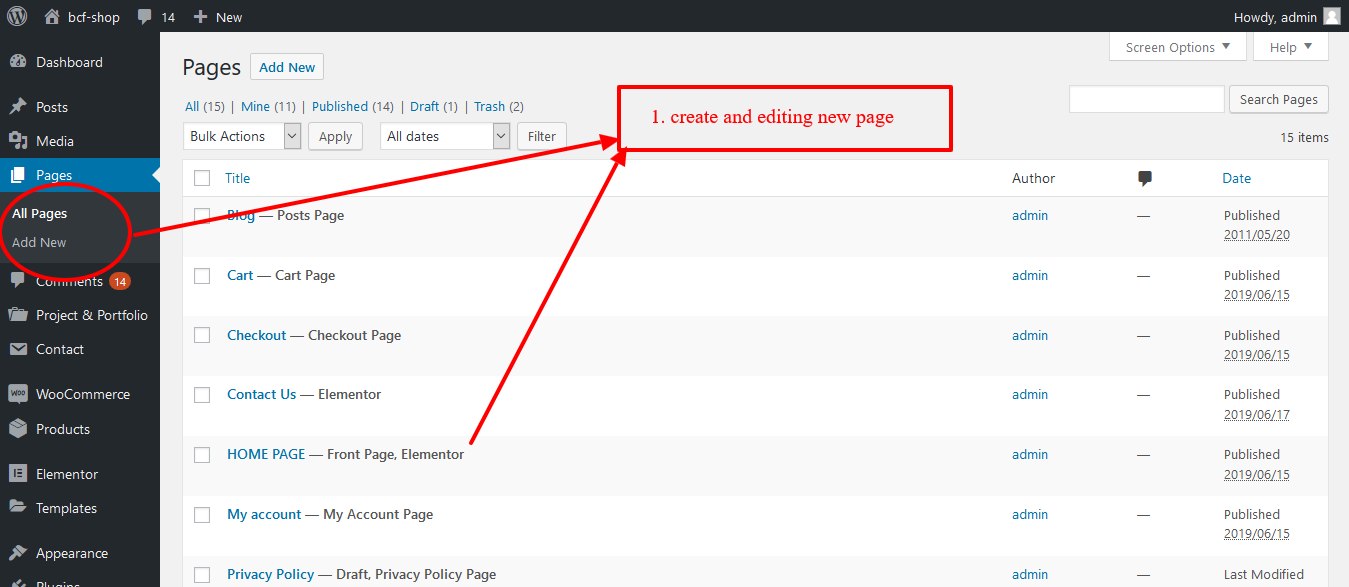
How to Create Home Page ?
Scroll down to bottom of page for instructions.
Step 1
Create (or editing) a new page by going to Pages > Add New in the WordPress Dashboard
Step 2
Give it a title and Choose Page Template & Go editor elementor page builder mode.

there is other options, you can choose page template directly on elementor

Step 3
Clicking on it will launch the Elementor user interface where you can edit your page using Elementor’s drag and drop page builder.
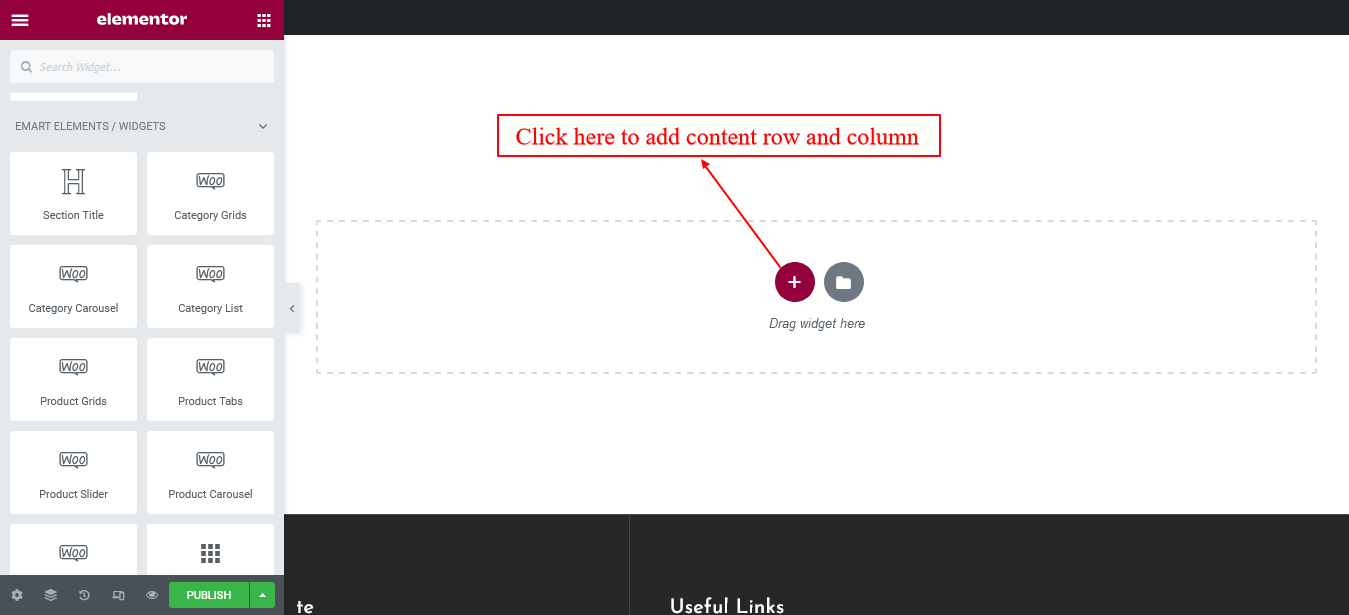
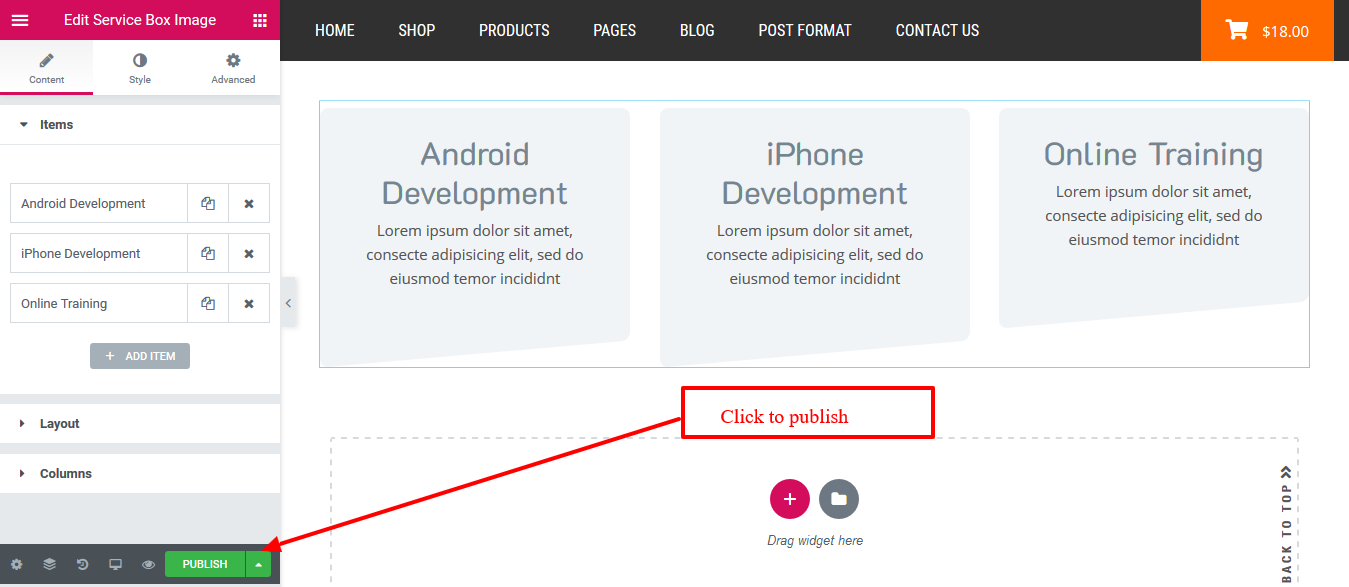
Now you can add sections and build your page from scratch.

after added your widgets hit to publish button.
Learn more about elementor section , check right menu of documentation
Front page Display Settings
Go to Settings & Reading.
Select the homepage from dropdown list. This page will become your home/front page.
Select the posts page from dropdown list. This page will become your blog page.
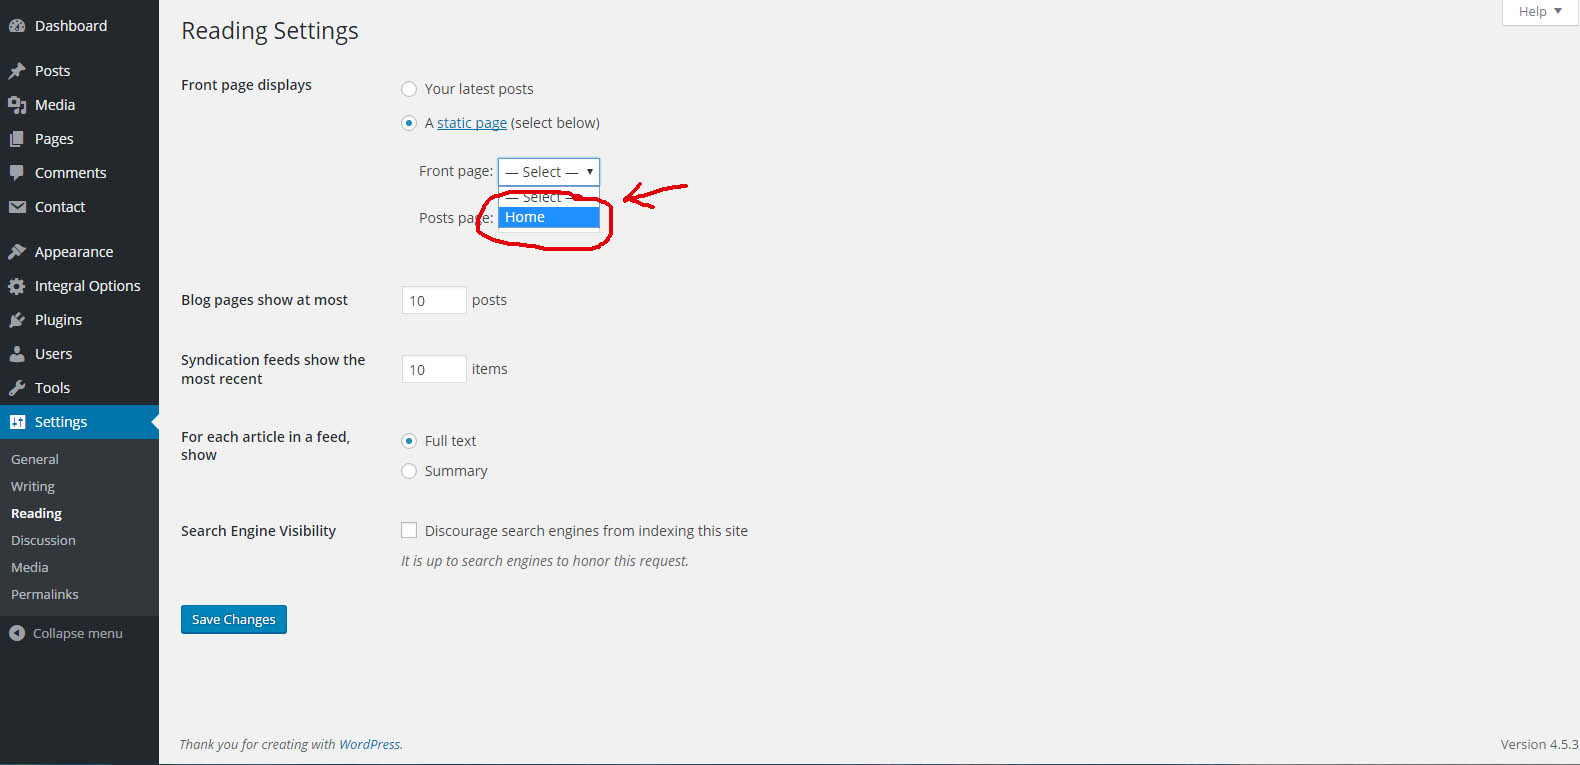
That’s it, you’re done!
Settings up slider / video / image
There are two ways to set up your home hero section, one is using the theme options or using any 3rd party plugins as widgets. we are going to show both ways to manage hero section of the home page.
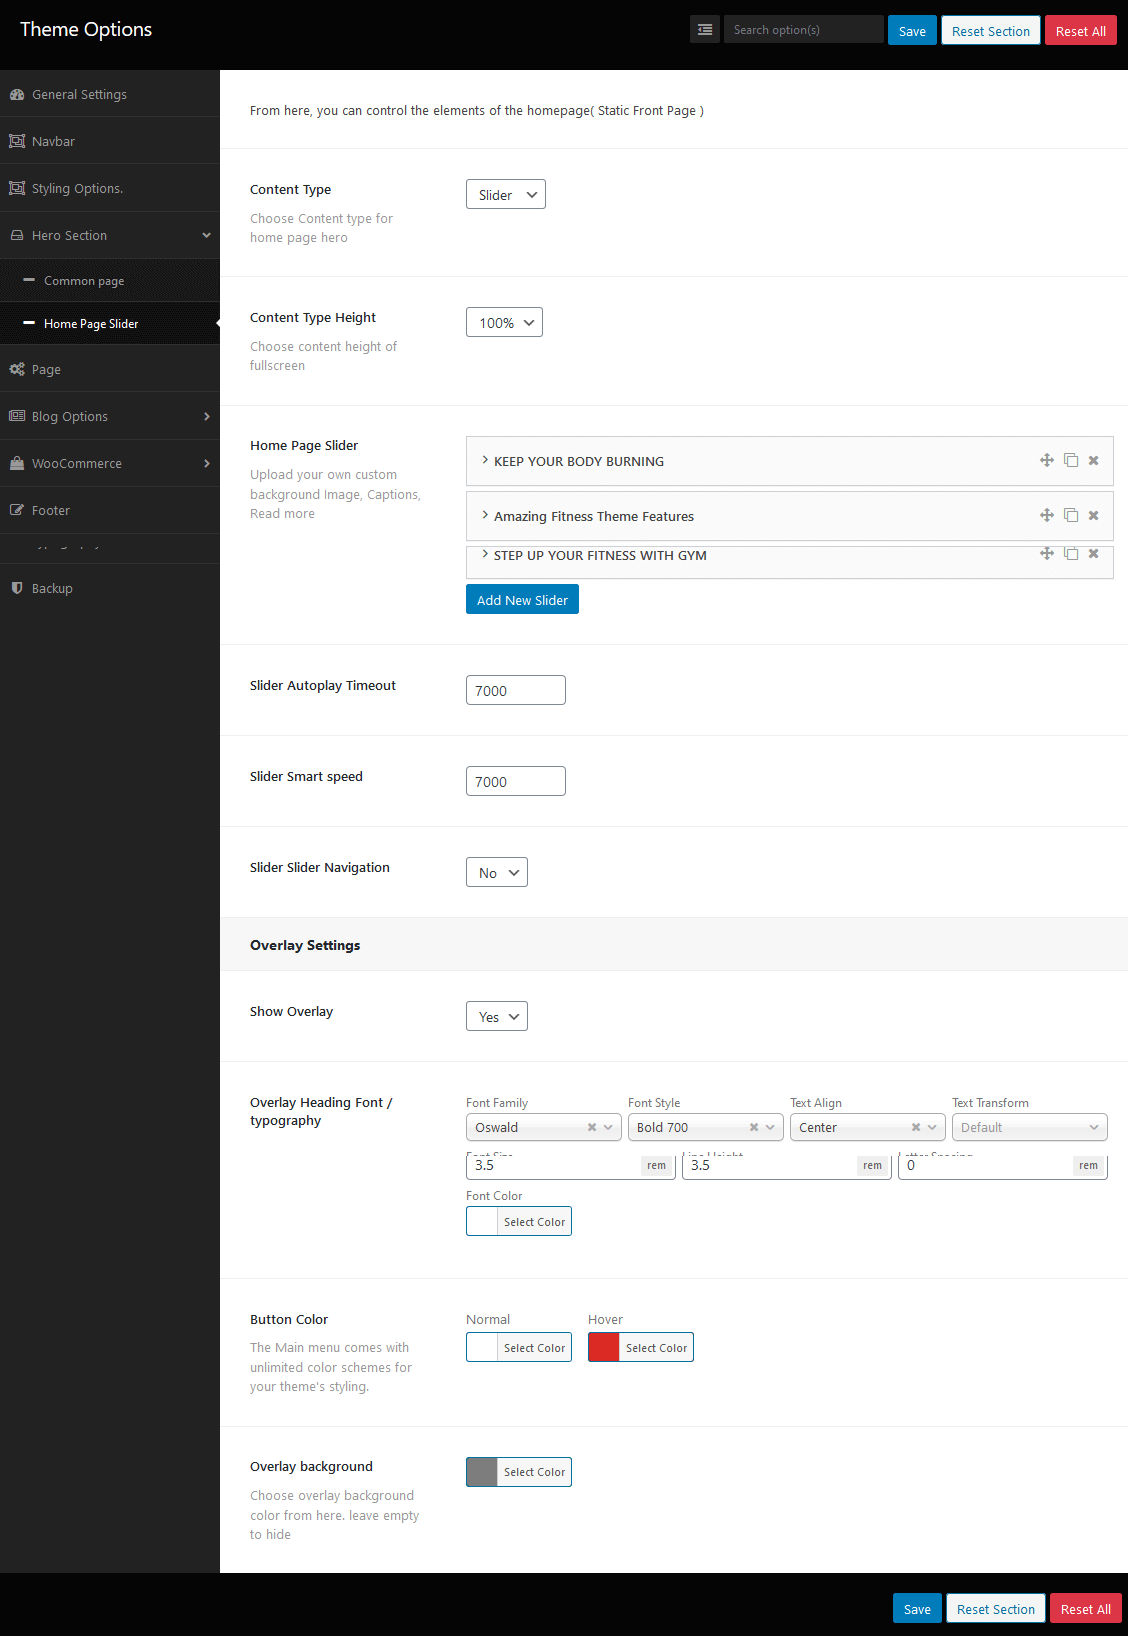
Adding Hero section Through Theme Options
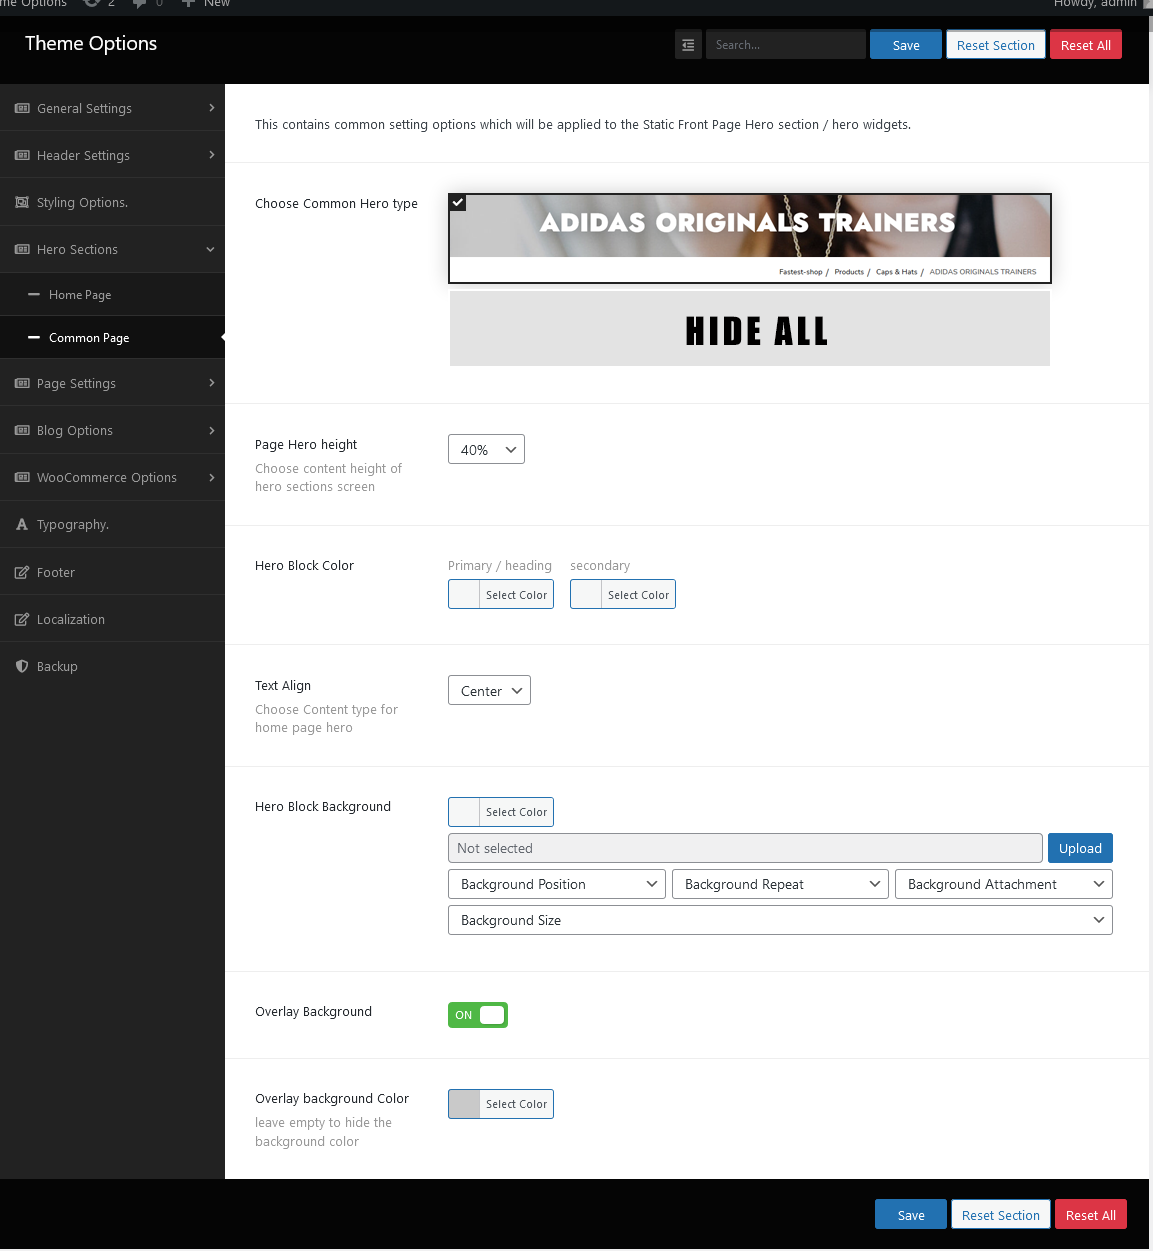
To add slider or video from theme options, please navigate WP-admin –> Theme options –> Hero section –> Home Page Hero . you will find more as bellow screenshot.Add you are items and save the save options. then hero section will auto appears to your home.
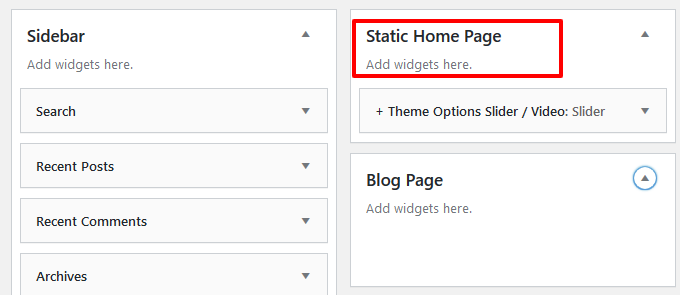
Adding Hero section Through any 3rd party plugins
if you like to use 3rd party slider plugins or any other, you can do simply as adding widgets, let’s go wp-admin –> Appearance –> Widgets –> Static Home Page, as screenshot bellow.
Common Page Settings
Page Settings offer different ways to change page layouts. The similarity of those terms is, at first, a little confused; let’s get an overview of what they each do.
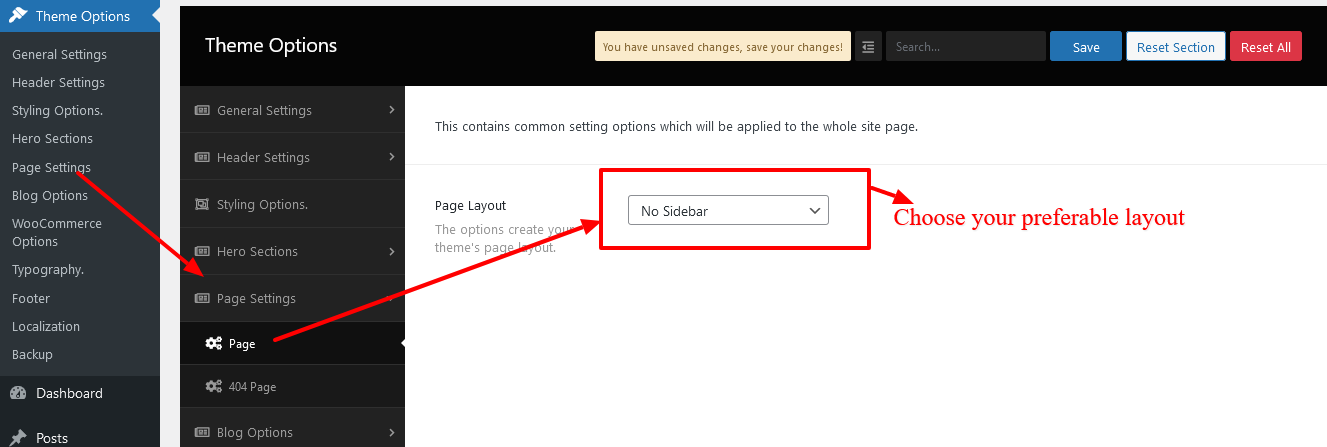
How to change the page layout?
In general, there are only 2 simple processes to update the eMart theme.
1) let’s update the page layout Globally; please Navigate to wp-admin ==> Theme Options ==> Page Settings, and you will find the below screenshot .
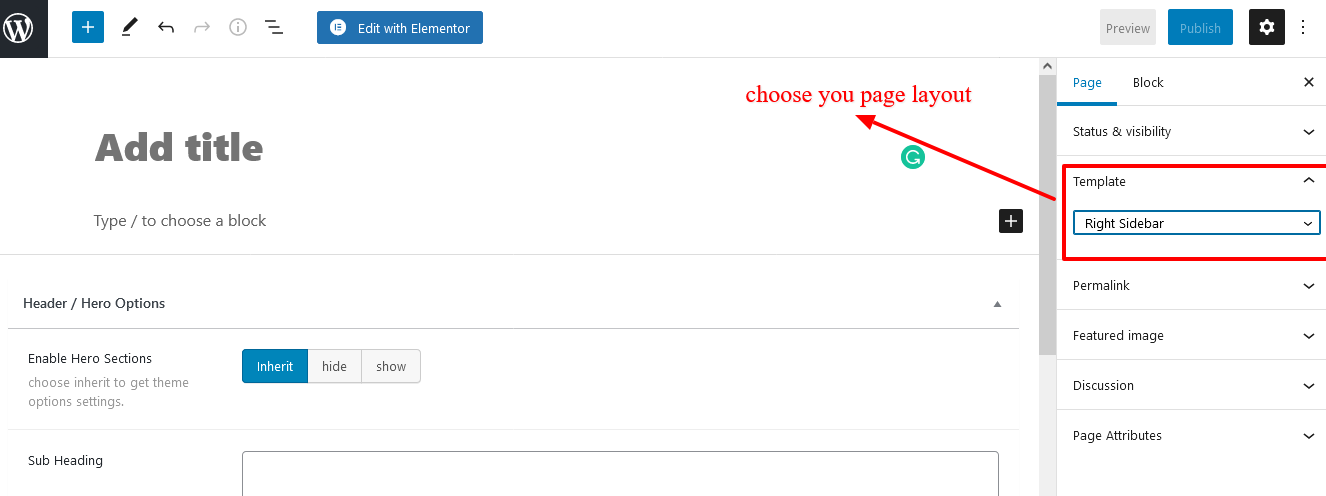
2) Page layout update via page meta box, let’s go wp-admin ==> add a new page ==> Template and choose a template from the dropdown list
How to remove/update the static page hero section?
You can show or hide the page here section or title. When you’re editing/adding a new page, this is what you should be looking for:
1) Using meta box to hide the hero section.
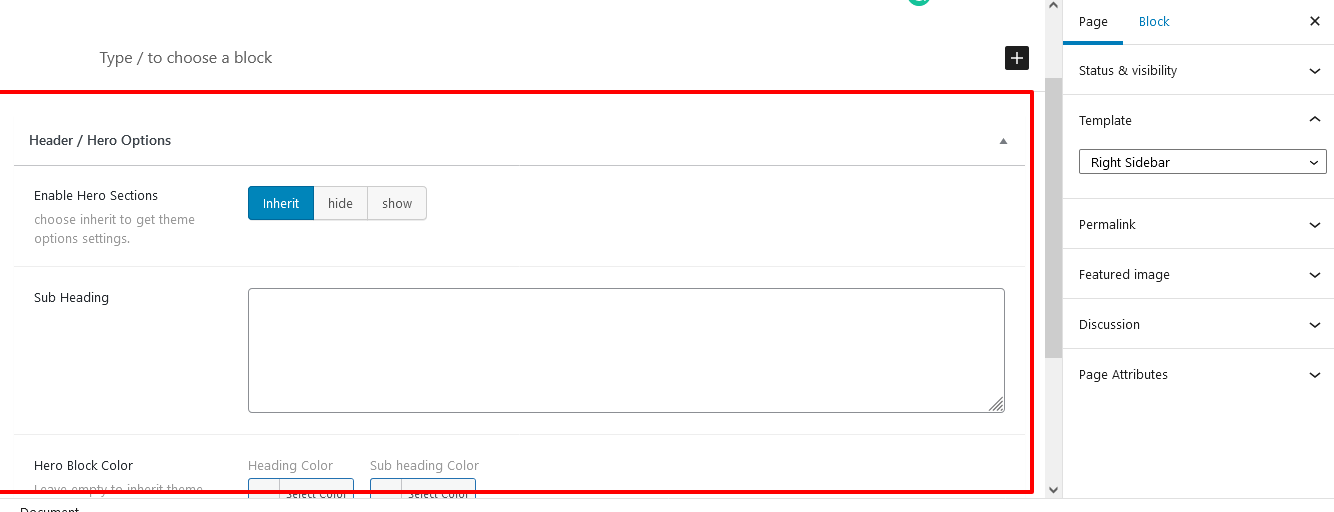
2) Global setting to hide the hero section
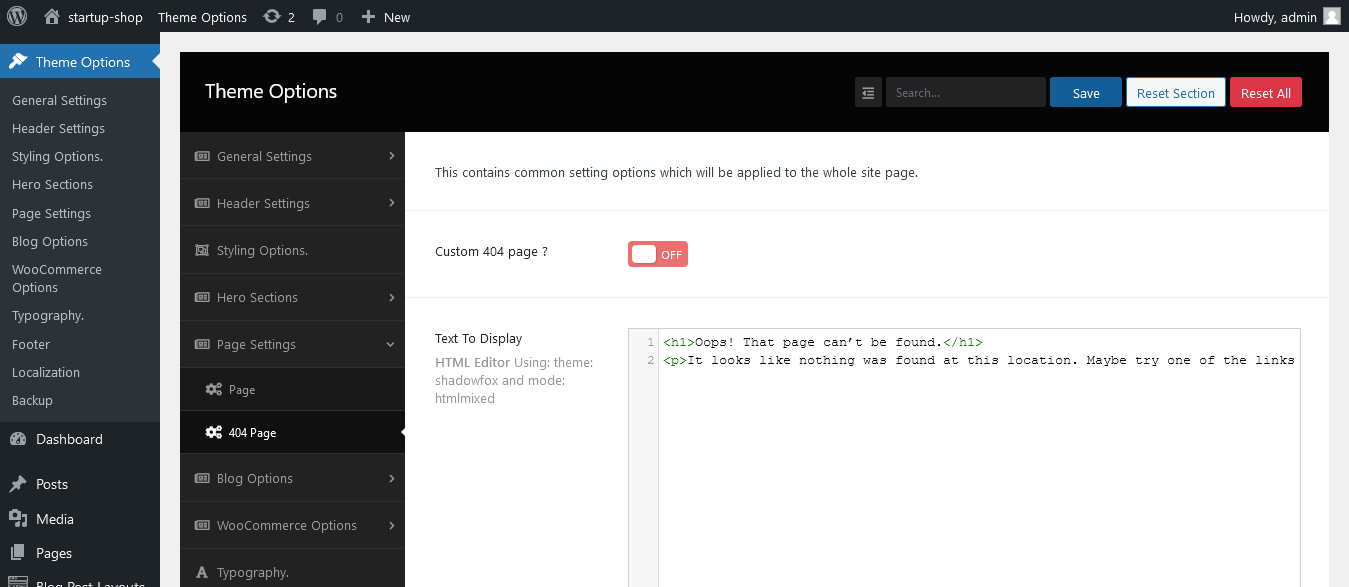
How to update the 404-page content?
With the eMart pro, you have options or customize the 404 page.
Blog/Archive Settings
In this segment, you’ll learn every potential customization of Blog layouts Of the eMart theme. Therefore, to customize the Blog layouts, read patiently but carefully to customizing.
How to change the blog layout?
First, go to your WP Dashboard ==> Theme Options ==> Blog Options ==> Archive/Blog. And in there, you’ll find the Blog Layout and a box with few options, such as Content – Primary Sidebar, Primary Sidebar – Content, No Sidebar, Full Container, etc. So, make the Blog Layout you desire.

How to change the Post style or Blog Template Layout on the Archive/Category?
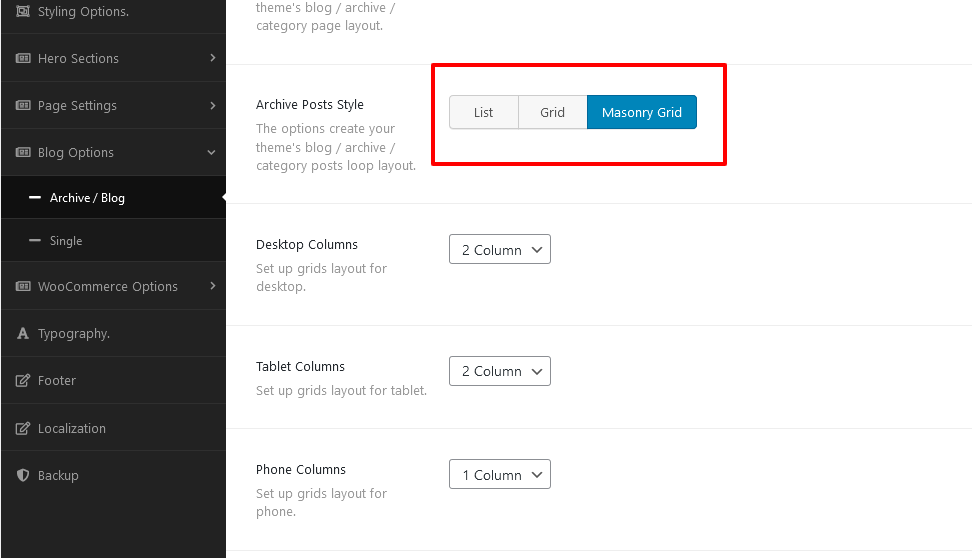
First, go to your WP Dashboard ==> Theme Options ==> Blog Options ==> Archive/Blog. And in there, you’ll find the Blog Template Layout with six different styles, such as Large image style, List style, 1 Larger than List style, Grid style, 1 Larger than Grid style, and Masonry style. So, make the change you desire.
How to change the Post Heading on Archive/Category?
First, go to your WP Dashboard ==> Theme Options ==> Blog Options ==> Archive/Blog. And in there, you’ll find the Archive heading Tag and a box with few options, such as H1, H2, H3, H4, H5, H6, etc. So, make the change of Heading on Archive/Category.

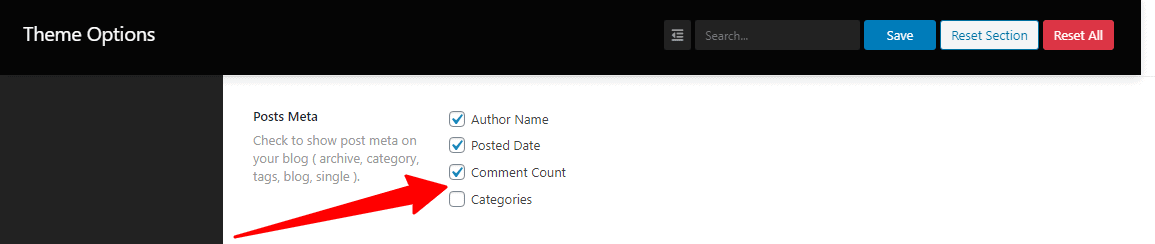
How to disable/enable the Posts Meta on Archive/Category?
First, go to your WP Dashboard ==> Theme Options ==> Blog Options ==> Archive/Blog. And in there, you’ll find the Posts Meta and a few options, such as Avatar, Author Name, Posted Date, Comment Count, and Categories. So, hit the boxes to disable/enable the Posts Meta.
How to change the read more/continue reading texts?
First, run your WP Dashboard ==> Theme Options ==> Blog Options ==> Archive/Blog. And in there, you’ll find the Archive Read more with an empty box. So, write there to make the change.

NB: Bear in mind, if you move without writing the box, it hides…
How to change the Post Content-type?
First, run your WP Dashboard ==> Theme Options ==> Blog Options ==> Archive/Blog. And in there, you’ll find the Content-Type and a box with a few options, such as to excerpt, content, and no content. So, judge wisely to switch the Post Content.

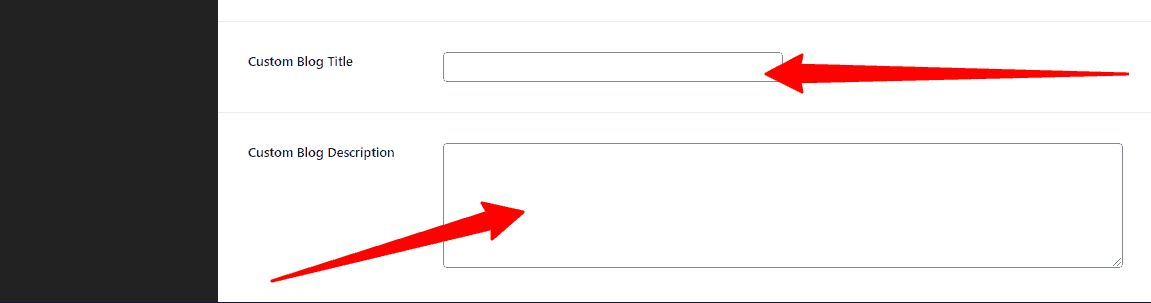
How you’ll change the Archive/Blog page Title/Description?
By default, the eMart theme shows the Site Title and Tag line. Therefore, changing the Site Title and Tag line without touching, first, go to your WP Dashboard ==> Theme Options ==> Blog Options ==> Archive/Blog. And in there, you’ll find the Custom Archive Title and Custom Archive Description with their empty boxes. So, make the change you desire.
Single Posts Settings
You can manage blog posts and categories in Posts section inside WordPress dashboard. this segment wraps with Single Posts Layout, enable/disable Post Meta, Post share icons, Related posts, column settings, and so on. So, to learn and customize the Single posts, let’s begin the topic.
How to change the Single Posts Layout?
First, run your WP Dashboard ==> Theme Options ==> Blog Options ==> Single. And in there, you’ll find the Single Posts Layout and a box with a few options, such as Content – Primary Sidebar, Primary Sidebar – Content, No Sidebar, Full Container, etc. So, make the Single Posts Layout you desire.

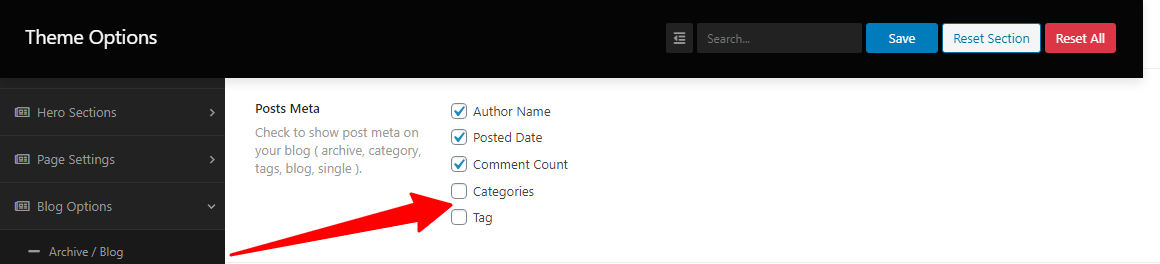
How to disable/enable the Post Meta on Single Posts?
First, go to your WP Dashboard ==> Theme Options ==> Blog Options ==> Single. And in there, you’ll find the Posts Meta and a few options, such as Avatar, Author Name, Posted Date, Comment Count, Categories, and Tag. So, hit the boxes to disable/enable the Posts Meta.
How to disable/enable the Next and Previous post?
First, go to your WP Dashboard ==> Theme Options ==> Blog Options ==> Single. And in there, you’ll find the Next and Previous post with an On/Off button. So, click “On” to enable the Next and Previous post.

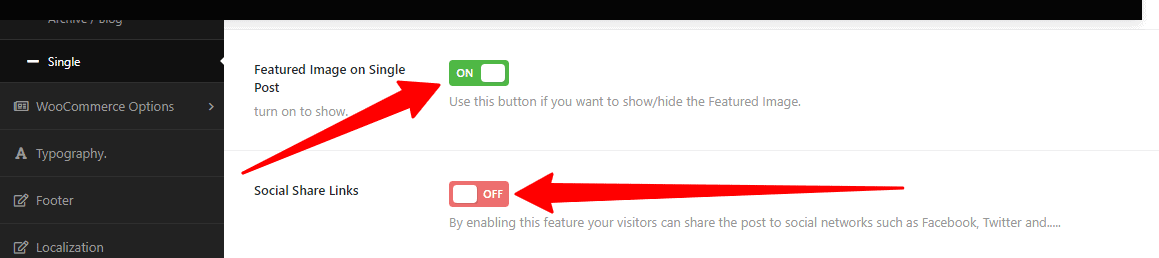
How to show the Featured Image and disable/enable the Social Share Links on Single Post?
First, go to your WP Dashboard ==> Theme Options ==> Blog Options ==> Single. You’ll find the Featured Image on Single Post with an On/Off button in there. So, hit the button to “On” to show the Featured Image on Single Post.
Second, go to your WP Dashboard ==> Theme Options ==> Blog Options ==> Single. And in there, you’ll find the Social Share Links with an On/Off button. So, click “Off” to disable the Social Share Links.
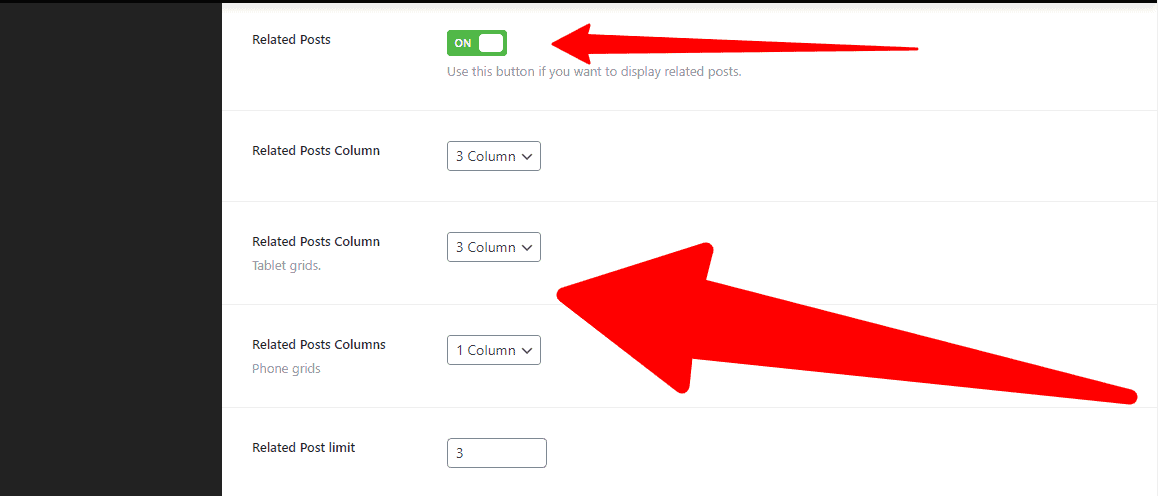
How to disable/enable the Related Posts and Column settings?
First, go to your WP Dashboard ==> Theme Options ==> Blog Options ==> Single. You’ll find the Related Posts with an On/Off button. So, click “On/Off” to enable/disable the Related Posts.
Similarly, you’ll find the Related Posts Columns (Desktop grids, Tablet grids, and Phone grids) and Related Post limit with their respective buttons. So, make the customization you desire.
WooCommerce Shop/Archive
In a word, we’re giving the entire explanation of the WooCommerce Shop/Archive customization settings in this section. For example, Shop/Archive Layout, Product Category, and Product tag, etc. So, to customize the WordPress store theme, carefully read and learn the settings.
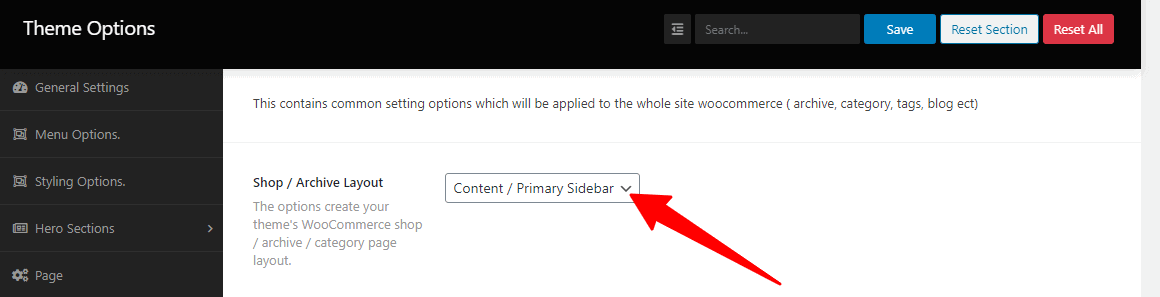
How you’ll change the Shop/Archive Layout?
Firstly, open your WordPress Dashboard ==> Theme Options ==> WooCommerce Options ==> Shop/Archive Page. Then, you’ll see the Shop/Archive Layout and a box with a few options, like Content – Primary Sidebar, Primary Sidebar – Content, No Sidebar, Full Container, etc. So, make the Shop/Archive Layout you want.
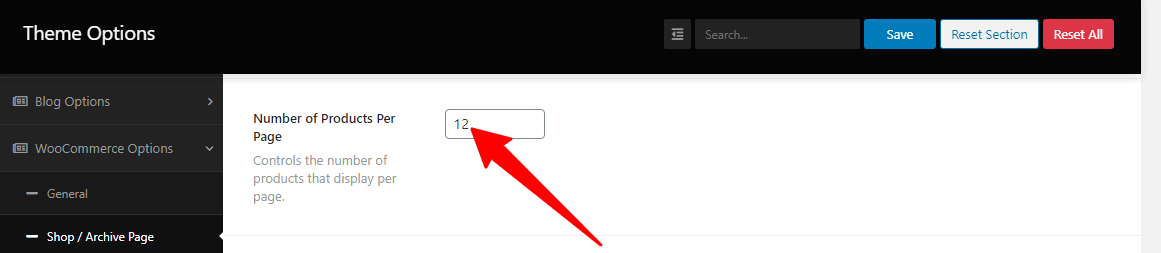
How you’ll set the number of products per page?
Firstly, open your WordPress Dashboard ==> Theme Options ==> WooCommerce Options ==> Shop/Archive Page. Then, you’ll see the Number of Products Per Page and a box. So, kindly make the number of products to show.
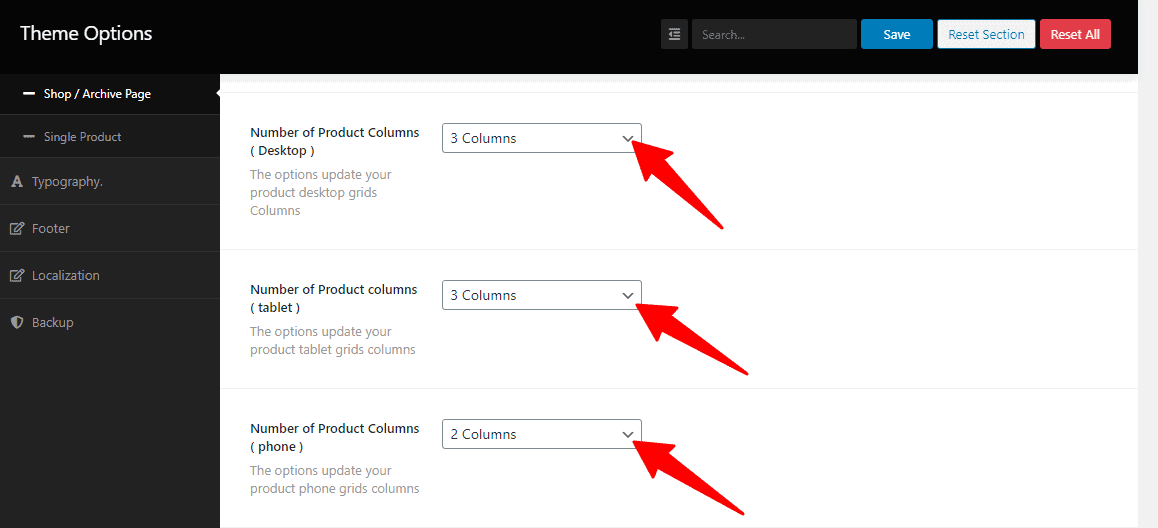
How you’ll set the number of product columns per page?
Firstly, open your WordPress Dashboard ==> Theme Options ==> WooCommerce Options ==> Shop/Archive Page. Then, you’ll see the Number of Product Columns and a drop-down with few options, like 1 column, 2 columns, 3 columns, 4 columns, etc. So, click the drop-down to create your columns.
How you’ll change the title tag?
Firstly, open your WordPress Dashboard ==> Theme Options ==> WooCommerce Options ==> Shop/Archive Page. Then, you’ll see the Shop Loop Heading Tag a box with few options, like H1, H2, H3, H4, H5, H6, etc. So, make the change for the title tag.

How you’ll change the product title linkable?
Firstly, open your WordPress Dashboard ==> Theme Options ==> WooCommerce Options ==> Shop/Archive Page. Then, you’ll see the Product title link and a box with two options, like On and Off. So, click the box to turn on/off the product title link.

How you’ll show/hide the product Short description?
First of all, open your WordPress Dashboard ==> Theme Options ==> WooCommerce Options ==> Shop/Archive Page. Then, you’ll see the Short Description and a box with two options, like On and Off. So, click the box to turn on/off the Short description.

How you’ll show/hide the product Wishlist button?
First of all, open your WordPress Dashboard ==> Theme Options ==> WooCommerce Options ==> Shop/Archive Page. Then, you’ll see the Wishlist button and a box with two options, like On and Off. So, click the box to turn on/off the Wishlist button.

How you’ll show/hide the product Compare button?
First of all, open your WordPress Dashboard ==> Theme Options ==> WooCommerce Options ==> Shop/Archive Page. Then, you’ll see the Compare button and a box with two options, like On and Off. So, click the box to turn on/off the Compare button.

How you’ll add the Sidebar widgets for a specific Shop page, or Product Category, or Product tag?
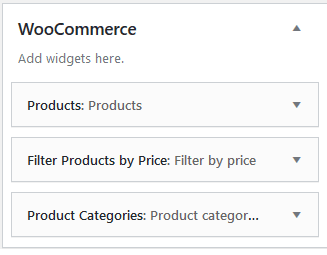
In the eMart Pro theme’s by default, display you the Primary sidebar. And if you desire a specific Sidebar for a Shop page, or Product Category, or Product tag, you need to open your WordPress Dashboard ==> Appearance ==> Widgets. In there, you’ll see the WooCommerce Sidebar options. So, make your specific Sidebar for the respective option.
WooCommerce Single Product
Now we’re going to describe to you the entire WooCommerce Single Product customization options. So, read and learn the customization options carefully to customize your site.
How you’ll change the Single Product Posts Layout?
Firstly, open your WordPress Dashboard ==> Theme Options ==> WooCommerce Options ==> Single Product. Then, you’ll see the Single Posts Layout and a box with a few options, like Content – Primary Sidebar, Primary Sidebar – Content, No Sidebar, Full Container, etc. So, make the Single Product Posts Layout you want.

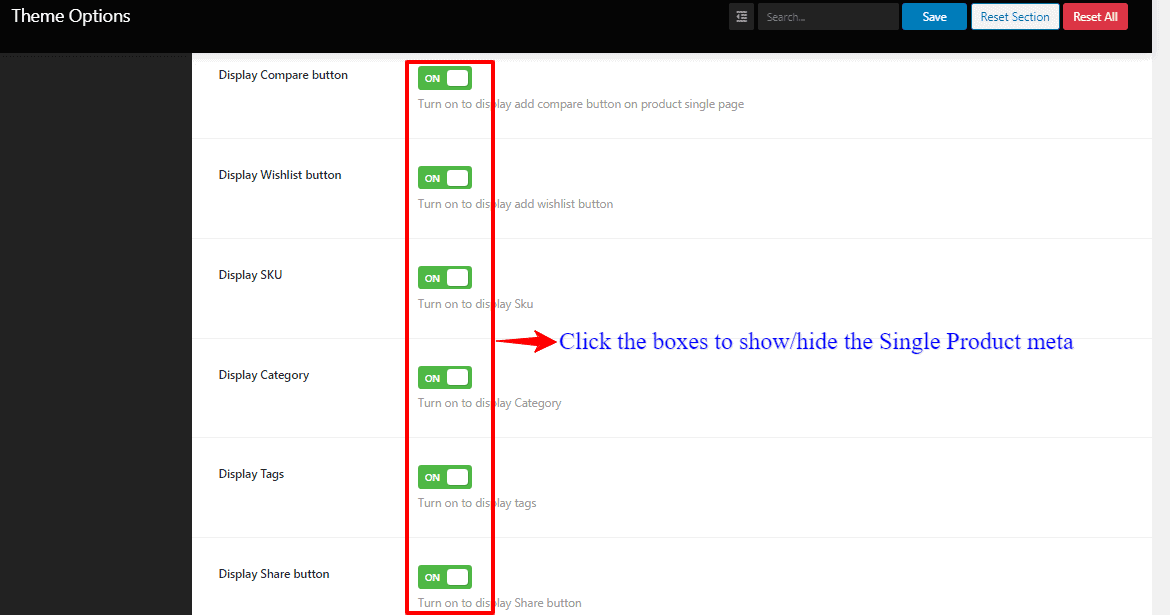
How you’ll show/hide the Single Product meta?
To clarify, we attach the Display Compare button, Display Wishlist button, Display SKU, Display Category, Display Tags, and Display Share button as a Single Product meta.
Therefore, open your WordPress Dashboard ==> Theme Options ==> WooCommerce Options ==> Single Product. In there, you’ll see the Display Compare button, Display Wishlist button, Display SKU, Display Category, Display Tags, Display Share button. And with their respective boxes with two options, like On and Off. So, click the boxes to show/hide the Single Product meta.
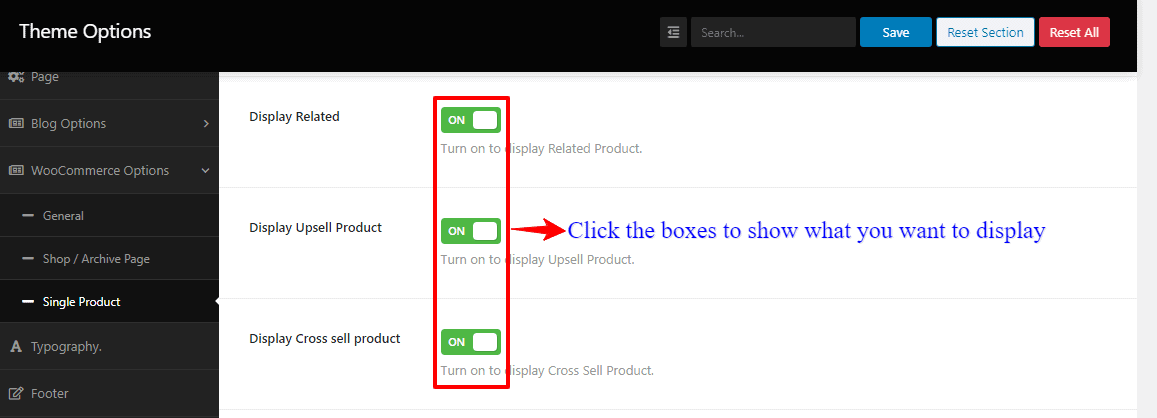
How you’ll show the Display Related, Display Upsell Product, Display Cross-sell product?
Firstly, open your WordPress Dashboard ==> Theme Options ==> WooCommerce Options ==> Single Product. Then, you’ll see the Display Related, Display Upsell Product, Display Cross-sell product. And with their respective boxes with two options, like On and Off. So, click these boxes to show what you want to display.
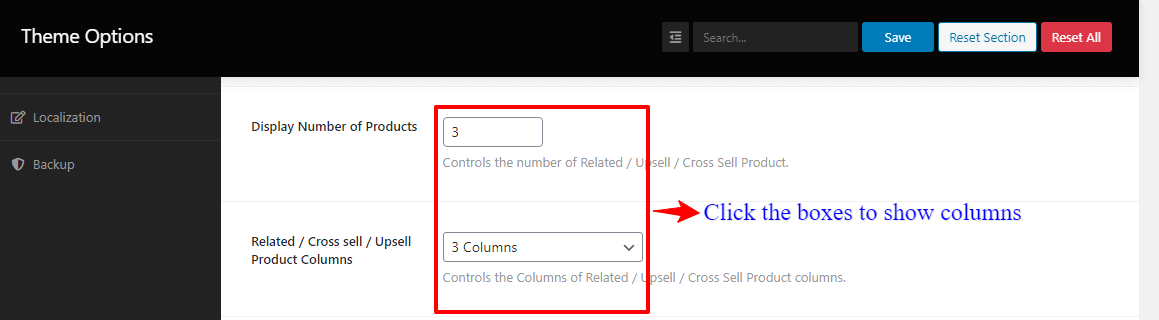
How you’ll show the Number of Products and Related/Cross-sell/Upsell Product Columns?
Firstly, open your WordPress Dashboard ==> Theme Options ==> WooCommerce Options ==> Single Product. Then, you’ll see the Display Number of Products, Related/Cross-sell/Upsell Product Columns, and with their respective boxes. So, click these boxes to show the columns.
Sidebars
WordPress 5.8 introduced a new block-based interface to widgets and sidebars management screen. As this may be confusing and possibly even cause incompatibility issues in some cases, you can consider reverting back the interface with Classic Widgets plugin.
eMart has 9 sidebar areas which can be used to add your own widgets. The widget areas are customisable with range of widgets. All sidebar areas can be customized from Appearance ==> Widgets.

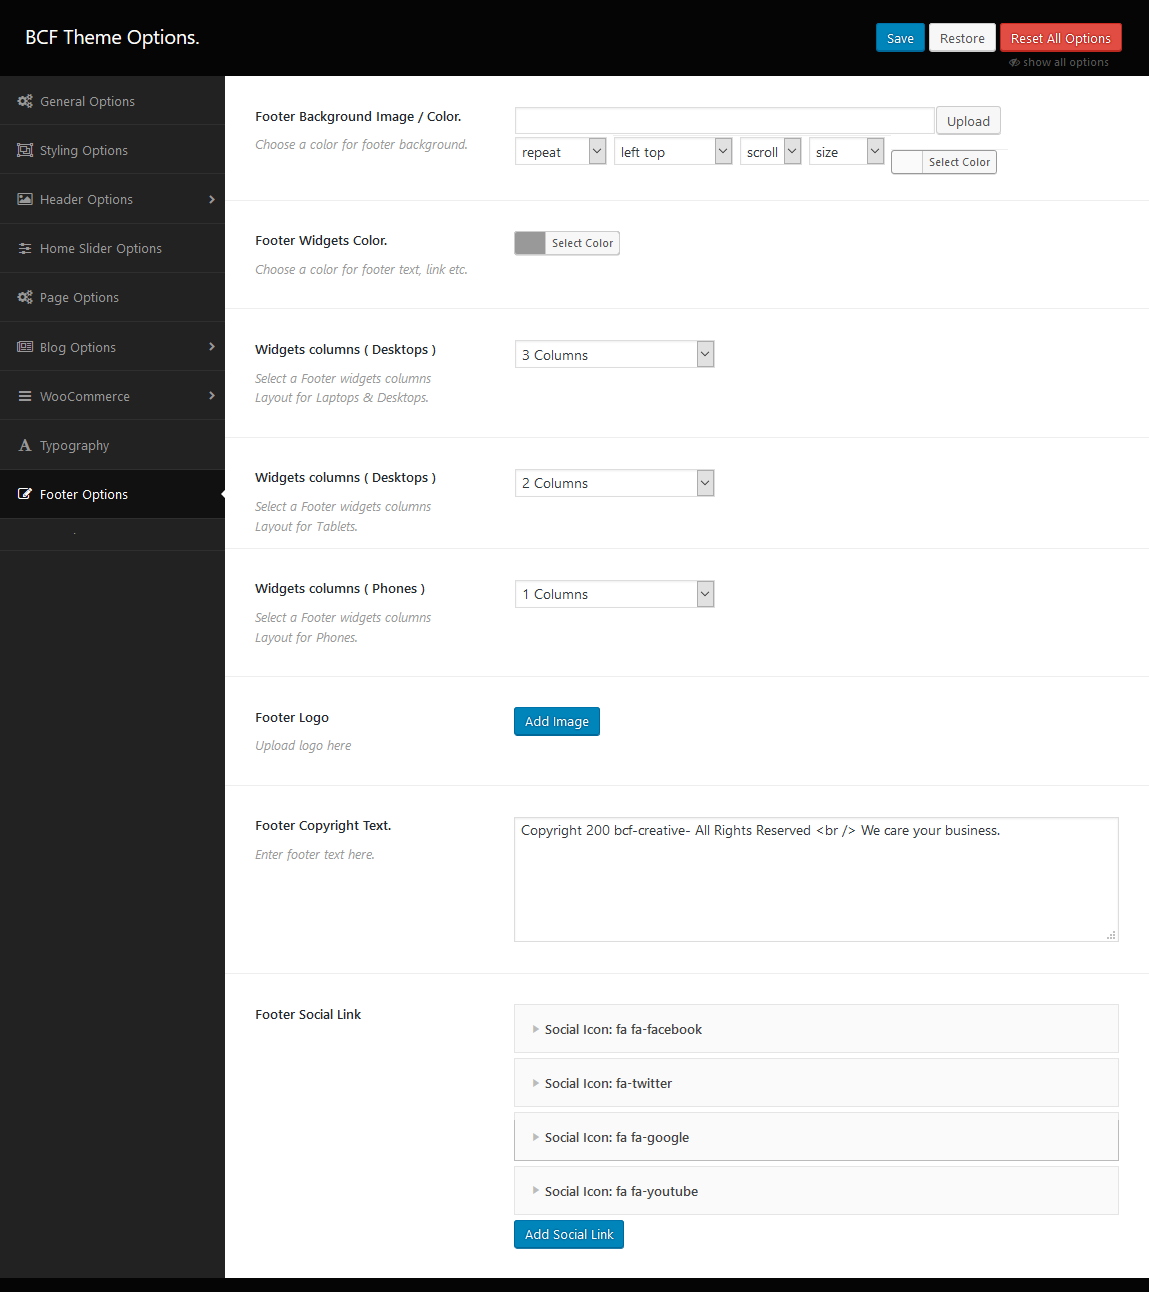
Footer Management
In this area of your site, you will be able to select your footer text, columns, footer logo, social media link & add a background image or color and layouts. In the case, you want to remove the Visualmodo default text form your footer ‘Powered by WordPress’ simply set/type your own signature text on ‘Footer Copyright Section Text’ following the attachment image.
Navigate to WordPress Dashboard ==> Theme Options ==> Footer Options .
Localization
Every WordPress theme contains some texts that need to be translated into your language if you are building a non-English website. This theme if fully translation ready.
How to Translate eMart Theme
Method 1: Using Poedit software
-
Create a copy of the original
modern/languages/modern.potfile. -
Rename the copied file now: add hyphen followed with your language code locale, and change the file extension to "po".
(So, the British English file would be namedmodern-en_GB.po.) -
Use Poedit to translate the file and export (save) translation in "mo" file format.
-
Upload translated
modern-en_GB.mofile into your WordPress languages directory, intothemesfolder (such as/wp-content/languages/themes/modern-en_GB.mo(if thethemesfolder does not exist in your WordPress languages directory, create it).
Methos 2: Translating in WordPress admin
If you would like to translate the theme directly in your WordPress dashboard you need to use a specialized plugin. Check out Loco Translate plugin and instructions on how to use it at beginner's guide and technical overview.
Support
We do our best to make your life easier with the Free support. Your feedback is valuable for us. We would love to hear from you. If you have any suggestion, positive comments or comment of suggestion, please feel free to contact us and we'll get in touch as soon as possible.